- Published on
Handle Paypal Express Checkout PHP
Express Checkout is a fast, easy way for buyers to pay with PayPal. Express Checkout eliminates one of the major causes of checkout abandonment by giving buyers all the transaction details at once, including order details, shipping options, insurance choices, and tax totals.
Studies show that adding the Express Checkout button to your website can increase your sales up to 18 percent.
When should you use Express Checkout:
Use Express Checkout to:
- Accept payments from any PayPal account.
- Eliminate the need for customers to enter personal information, including shipping, billing, or payment information.
- Keep customers on your site after completing the transaction.
- Sign up customers to make payments at regular intervals.
- See more at: https://www.paypal.com/webapps/mpp/express-checkout
How do we implement it on our site
 Personally, i found that PayPal developer guide is very huge and many links can get you confused on what you were trying to achieve. Lets skip to a short and simple process.
First download the https://github.com/amirduran/duranius-paypal-rest-api-php-library paypal library from github.
After downloading you will find two folders. Inside the example folder you will find few example code that can be implemented to direct access the checkout page.
Step 1
In the folder called library you will find two files
1. DPayPal.php
2. cacert.pem
Copy both files in your project folder, and reference file DPayPal.php using require_once php command require_once “DPayPal.php” which is already done in the example.
Make sure that both files DPayPal.php and cacert.pem are located in the same folder.
If you want to keep the files DPayPal.php and cacert.pem in the different folders, then open the file DPayPal.php and edit the following line
from CURLOPT_CAINFO => dirname(__FILE__) . ‘/cacert.pem’, //CA cert file
to CURLOPT_CAINFO => “PATH TO YOUR cacert.pem file”
Step 2
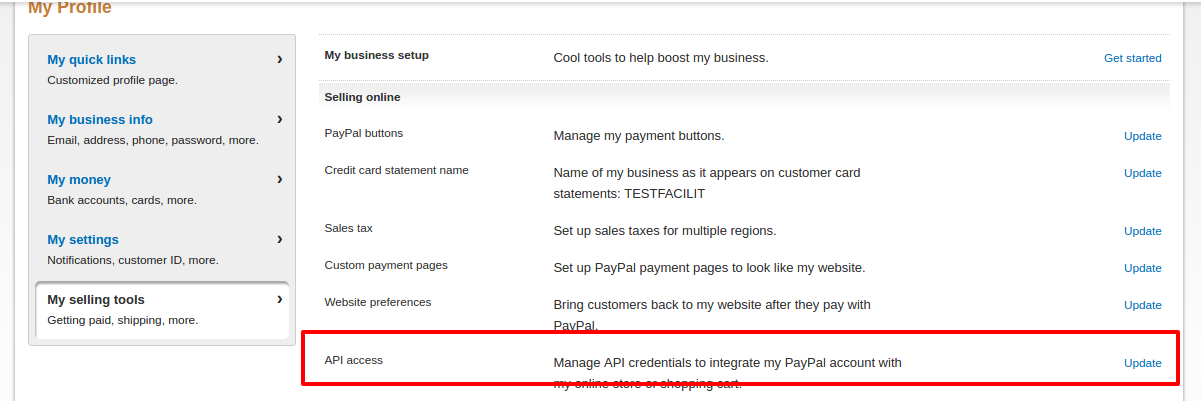
Enter your paypal API Credentials by going to your buyer sandbox or paypal account.
You’ll need to create an API username for PayPal that’s different from your shopping cart’s username. You can access PayPal via API only if you have a PayPal Premier / Business / Website Payments Pro account.
Follow these steps:
a. Log in to your PayPal Business account.
b. Click the My Account tab.
c. Click the Profile tab. If you haven’t already done so, you need to verify your account before requesting API credentials.
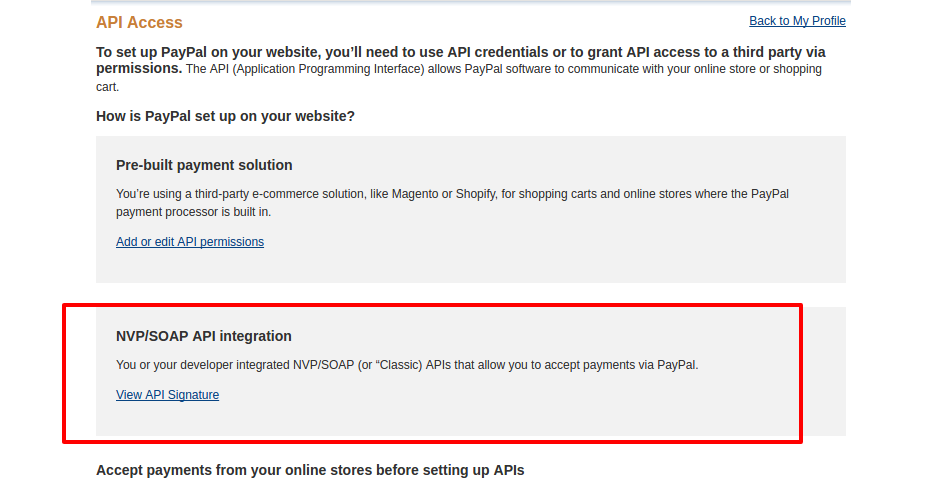
d. Click Request API credentials under Account information.
e. Click Set up PayPal API credentials and permissions under Option 1.
f. Click Request API Credentials.
g. Click Request API signature.
h. Click Agree and Submit.
i. Copy and paste the API username, password, and signature into your shopping cart’s configuration or administration screen.

Complete the process by following your shopping cart’s final steps.
Diving into Code
Open your DPayPal.php file which looks like below:
class DPayPal {

    //API Credentials
    protected $username = "Your Username"; //PayPal API username
    protected $password = "Genrated API Password"; //PayPal API password
    protected $apiSignature = "Generated Signature"; //PayPal API signature
    protected $apiVersion = "94"; //Set PayPal API version
    //If you are using live environment use the following URL: https://api-3t.paypal.com/nvp
    //If you are using sandbox environment then use the following URL: https://api-3t.sandbox.paypal.com/nvp
    protected $payPalAPIUrl = "https://api-3t.sandbox.paypal.com/nvp";
    protected $errorReportingEnabled = true;
    protected $errors = array(); //Here you can find errors for your last API call
    protected $lastServerResponse; //Here you can find PayPal response for your last successfull API call
    protected $curl;

    public function SetExpressCheckout($request) {}
}
$username is your username where you will get it from step 2 API Username. Similarly, same for $password and $apisignature. We are using version 94 here. You can check all versions from https://developer.paypal.com/docs/classic/release-notes/.
Now, next step to process the orders by listing them and sending them as post data into PayPal server. This will be more secure since we will be doing all transaction from PayPal itself and after the payment is done we captured the response and output a success message in our system.
Open payment.php and create a success.php file in same folder but we wont do anything for this file right now. As, in example; everything has been done we just need to do a few tweaks according to our needs.
payment.php
<?php

require_once '../library/DPayPal.php'; //Import library

$paypal = new DPayPal();
$requestParams = array(
    'RETURNURL' => "http://localhost/sandbox/paypal/example/success.php", //Enter your webiste URL here
    'CANCELURL' => "http://localhost/sandbox/paypal/example/cancel.php"//Enter your website URL here
);

$orderParams = array(
    "MAXAMT" => "100", //Set max transaction amount
    "NOSHIPPING" => "1", //I do not want shipping
    "ALLOWNOTE" => "1", //I do not want to allow notes
    "BRANDNAME" => "Deepu Test",
);
$item = array(
    'PAYMENTREQUEST_0_AMT' => "20",
    'PAYMENTREQUEST_0_CURRENCYCODE' => 'USD',
    'PAYMENTREQUEST_0_ITEMAMT' => "20",
    'L_PAYMENTREQUEST_0_NAME0' => 'Service',
    'L_PAYMENTREQUEST_0_DESC0' => 'This is a Service',
    'L_PAYMENTREQUEST_0_AMT0' => "20",
    'L_PAYMENTREQUEST_0_QTY0' => '1',
      //"PAYMENTREQUEST_0_INVNUM" => $transaction->id - This field is useful if you want to send your internal transaction ID
);

echo "Calling PayPal SetExpressCheckout method<br>";
//Now you will be redirected to the PayPal to enter your customer data
//After that, you will be returned to the RETURN URL
$response = $paypal->SetExpressCheckout($requestParams + $orderParams + $item);
echo "Response from PayPal received:<br>".var_dump($response);
//Response is aslo accessible by calling  $paypal->getLastServerResponse()
echo "In 5 seconds you will be redirected to PayPal to enter your credentials.";

if (is_array($response) && $response['ACK'] == 'Success') { //Request successful
    //Now we have to redirect user to the PayPal
    $token = $response['TOKEN'];

    header('Location: https://www.sandbox.paypal.com/cgi-bin/webscr?cmd=_express-checkout&token=' . urlencode($token));
} else if (is_array($response) && $response['ACK'] == 'Failure') {
    var_dump($response);
    exit;
}
exit;
The above code is basically same as in the example. Few lines have been changed. Change return to the path where you had created your success.php file earlier. OrderParams are the parameter where you will pass your order details but not item details. Most related to your shop details and settings.
Similarly, the items array will hold your items details. You can know all methods from https://developer.paypal.com/docs/classic/api/merchant/SetExpressCheckout_API_Operation_NVP/. For now we are just sending 1 item as order.

Now open up your browser and browse to the payment.php file. It will redirect you PayPal. You should see screen like alongside where your items details are shown when clicked on the dropdown.
You will need to login using your sandbox account credentials. See https://developer.paypal.com/docs/classic/lifecycle/sb_create-accounts/.
Now for success.php file:
success.php
<?php

require_once '../library/DPayPal.php'; //Import library

$paypal = new DPayPal(); //Create an object

if( isset($_GET['token']) && !empty($_GET['token']) ) { // Token parameter exists
  // Get checkout details, including buyer information.
  // We can save it for future reference or cross check with the data we have
	$checkoutDetails = $paypal->GetExpressCheckoutDetails( array('TOKEN' => $_GET['token']) );

	if( is_array($checkoutDetails) && $checkoutDetails['ACK'] == 'Success' ) {
		?>
		<table>
			<tr><td>TIMESTAMP -></td><td><?php echo $checkoutDetails['TIMESTAMP']; ?></td></tr>
			<tr><td>ACK -></td><td><?php echo $checkoutDetails['ACK']; ?></td></tr>
			<tr><td>BUYER EMAIL -></td><td><?php echo $checkoutDetails['EMAIL']; ?></td></tr>
			<tr><td>FIRSTNAME -></td><td><?php echo $checkoutDetails['FIRSTNAME']; ?></td></tr>
			<tr><td>LASTNAME -></td><td><?php echo $checkoutDetails['LASTNAME']; ?></td></tr>
			<tr><td>COUNTRYCODE -></td><td><?php echo $checkoutDetails['COUNTRYCODE']; ?></td></tr>
			<tr><td>SHIPTONAME -></td><td><?php echo $checkoutDetails['SHIPTONAME']; ?></td></tr>
			<tr><td>SHIPTOSTREET -></td><td><?php echo $checkoutDetails['SHIPTOSTREET']; ?></td></tr>
			<tr><td>SHIPTOCITY -></td><td><?php echo $checkoutDetails['SHIPTOCITY']; ?></td></tr>
			<tr><td>SHIPTOSTATE -></td><td><?php echo $checkoutDetails['SHIPTOSTATE']; ?></td></tr>
			<tr><td>SHIPTOZIP -></td><td><?php echo $checkoutDetails['SHIPTOZIP']; ?></td></tr>
			<tr><td>TOTAL AMOUNT -></td><td><?php echo $checkoutDetails['AMT']; ?></td></tr>
			<tr><td>ITEMAMT -></td><td><?php echo $checkoutDetails['ITEMAMT']; ?></td></tr>
			<tr><td>SELLER ACCOUNT EMAIL -></td><td><?php echo $checkoutDetails['PAYMENTREQUEST_0_SELLERPAYPALACCOUNTID']; ?></td></tr>
		</table>
		<?php
	}

	$requestParams = array(
		'TOKEN' => $_GET['token'],
		'PAYERID' => $_GET['PayerID'],
		'PAYMENTREQUEST_0_PAYMENTACTION' => 'SALE',
		'PAYMENTREQUEST_0_AMT' => $checkoutDetails['AMT'],
		'PAYMENTREQUEST_0_CURRENCYCODE' => 'USD'
		);

	$response = $paypal->DoExpressCheckoutPayment($requestParams);
	echo '<pre>';
	var_dump($response);
	echo '</pre>';

  if( is_array($response) && $response['ACK'] == 'Success') { // Payment successful
  	$transactionId = $response['PAYMENTINFO_0_TRANSACTIONID'];
  	echo '<pre>';
  	var_dump($transactionId);
  	echo '</pre>';
  }
}
After you have successfully processed your ordered from paypal. You will be redirected to success.php page. You payment information is shown. You will need to store these information into database for future references.